Contents
Intro
In this two part series we’ll be talking about what a message queue is and when you would use one in your application. From there we’ll dive into the Broadway library maintained by Plataformatec and see how it can be leveraged from within an application for data processing. Finally, we’ll create a sample project that makes use of RabbitMQ+Broadway to scrape comments from HackerNews so we can measure the popularity of Elixir over time. Without further ado, let’s dive right into things!
What is a message queue?
Funny enough, a message queue is exactly what it sounds like…a queue of messages (a rarity indeed to have a technical term be self explanatory :)). On one side, you have messages being published to the queue by what are called producers, and on the other side you have messages being consumed from the queue by what are called consumers. The messages that the producers publish to the queue are dispatched to the consumers in a FIFO (first in first out) fashion. Regardless of your message queue implementation, this is the fundamental flow:
Message producer -> Message queue -> Message consumer
Why use a message queue?
While the previous description seems rather rudimentary, the impact that a message queue can have on your architecture is quite profound. Fundamentally, it allows your architecture to shift from being synchronous to being asynchronous. As an example, we’ll imagine a user registration flow in a synchronous world and an asynchronous world. Our user registration flow has the following requirements:
- Must persist user data to our DB
- Add user to our mailing list
- Upload their avatar to S3 after performing some image adjustments
In a non-message queue system:
                Persist user to DB
                Add user to mailing list
POST /user  ->  Resize image with ImageMagick  ->  Return 201
                Upload image to S3
In a message queue system:
                Persist user to DB
POST /user  ->  Publish new email to RabbitMQ  ->  Return 201
                Publish new image to RabbitMQ

---------------------------------------------------------------------------------

New email RabbitMQ queue  ->  Message consumer  ->  Add user to mailing list

---------------------------------------------------------------------------------

                                                     Resize image with ImageMagick
New avatar RabbitMQ queue  ->  Message consumer  ->  Upload image to S3
                                                     Update DB with S3 location
When performing the create user action in a synchronous fashion, all operations must complete before returning a response to the requester. In other words, the manipulation of the avatar via ImageMagick+upload to S3 and adding the user to your MailChimp mailing list must complete before you can respond to the request. If you have to perform retries or there is network latency this will delay responding to the request. On the other hand, when performing the user creation in an asynchronous fashion, you delegate the external resource calls to the message consumers and only perform the minimum number of changes to the DB. This in turn will result in a much faster turn around to the user, while the additional operations happen in the background afterwards. Doing this in an asynchronous fashion is not without its tradeoffs though. If there are issues for example with the avatar that the user uploaded, there is no clean way to rollback and fail the user creation action as the user has already been created and you only know about the issue after the fact.
The important thing to note here is that you are dispersing your side-effects across different entities and rolling them back will be tricky at best or impossible in some situations. Planning out some failure points and their repercussions will go a long way here and will help you from designing yourself into a corner.
What is Broadway and what does it have to do with RabbitMQ?
In short, Broadway is a library that allows you to create multi-stage data processing pipelines. Via the facilities provided to you in Broadway, you can define how you would like data to be processed through the pipeline and with what level of concurrency. In order to power these data pipelines, Broadway requires a messaging queue and currently officially supports 3: Amazon SQS, Google Pub/Sub and RabbitMQ. For the purposes of this tutorial we will be using RabbitMQ given we can host it ourselves on our local machine. Some other important features that Broadway provides out of the box are back-pressure so the pipeline is never flooded, batching so that messages can be grouped if needed and graceful shutdowns which ensure that items in flight are processed before the BEAM is terminated. A more complete list of features can be found here: https://hexdocs.pm/broadway/Broadway.html#module-built-in-features
Show me the code!
In order to showcase the capabilities of Broadway and RabbitMQ, we will setup an application which leverages both to
ingest and process data from the HackerNews API. Specifically, we’ll be going on a journey through memory lane and
processing all HackerNews items since Elixir was first announced by José Valim in 2011
(https://news.ycombinator.com/item?id=2306006). The goal is to see how the frequency of the words Elixir and Erlang
have changed over time in various HackerNews entries. Since I am firm believer in monitoring my applications, I will be
adding Prometheus+Grafana to this project but will not be covering them as I have other posts that cover monitoring and
Prometheus specifically (https://akoutmos.com/post/prometheus-postgis-and-phoenix/). In addition, this tutorial assumes
you have Docker and Docker Compose up and running locally.
Step 1: Create a new Elixir project with required dependencies - commit
To begin, we’ll start off by creating a vanilla Elixir project with a supervisor. To create your application run the following in your terminal:
$ mix new elixir_popularity --sup
After that is done, open the mix.exs and add the following to the deps function:
defp deps do
  [
    {:jason, "~> 1.1.2"},
    {:httpoison, "~> 1.6.1"},
    {:broadway, "~> 0.4.0"},
    {:broadway_rabbitmq, "~> 0.4.0"},
    {:ecto_sql, "~> 3.0"},
    {:postgrex, ">= 0.0.0"},
    {:gen_rmq, "~> 2.3.0"}
  ]
end
With your dependencies in place, run mix deps.get from the terminal and you are good to go!
Step 2: Setup development Docker Compose stack - commit
For our development stack, we’ll be running a few services. Some are required and others are optional depending on whether you want to have monitoring in place for your application:
- RabbitMQ (REQUIRED) - We will be using RabbitMQ as our message queue system to process our HackerNews items. We will be writing 2 Broadway pipelines which will be read from different queues in order to perform their required work.
- Postgres (REQUIRED) - After we have fetched our items from the HackerNews API and they have gone through the necessary processing steps in Broadway, we will persist our findings in Postgres for later querying.
- Postgres Exporter (OPTIONAL) - We will use this to get performance statistics out of Postgres so we can see how it behaves under load.
- Grafana (OPTIONAL) - Grafana will fetch time series data out of Prometheus and display it.
- Prometheus (OPTIONAL) - Prometheus will pull statistics from the various data sources (cAdvisor, Postgres Exporter, and RabbitMQ)
- cAdvisor (OPTIONAL) - cAdvisor will collect metrics on the host machine running all the containers.
You may have noticed that our Elixir application is no where to be seen on this list of services. The reason for that
being that we will be interacting with our application via an IEx session on our local machine, and only require the
supporting services to be running in containers. In a production-esque environment, running this process in an IEx
session is most likely not what you want…but this is a tutorial and I can take some shortcuts :). Below is a copy of
the docker-compose.yml file that should be in the root of your project (feel free to remove any services that you do
not require):
version: '3.7'

services:
  cadvisor:
    image: google/cadvisor:v0.33.0
    ports:
      - '8080:8080'
    volumes:
      - /:/rootfs:ro
      - /var/run:/var/run:ro
      - /sys:/sys:ro
      - /var/lib/docker/:/var/lib/docker:ro

  rabbitmq:
    image: rabbitmq:3.8
    ports:
      - '5672:5672'
      - '15672:15672'
      - '15692:15692'
    volumes:
      - ./docker/rabbitmq/plugins:/etc/rabbitmq/enabled_plugins
      - ./docker/rabbitmq/rabbitmq.conf:/etc/rabbitmq/rabbitmq.conf:ro
      - rabbitmq-data:/var/lib/rabbitmq

  postgres:
    image: postgres:12.0
    ports:
      - '5432:5432'
    volumes:
      - postgres-data:/var/lib/postgresql/data
    environment:
      POSTGRES_PASSWORD: postgres
      POSTGRES_USER: postgres

  postgres_exporter:
    image: wrouesnel/postgres_exporter:v0.7.0
    ports:
      - '9187:9187'
    depends_on:
      - postgres
    environment:
      DATA_SOURCE_USER: postgres
      DATA_SOURCE_PASS: postgres
      DATA_SOURCE_URI: postgres:5432/?sslmode=disable

  grafana:
    image: grafana/grafana:6.4.4
    depends_on:
      - prometheus
    ports:
      - '3000:3000'
    volumes:
      - grafana-data:/var/lib/grafana
      - ./docker/grafana/:/etc/grafana/provisioning/
    env_file:
      - ./docker/grafana/.env

  prometheus:
    image: prom/prometheus:v2.13.0
    ports:
      - '9090:9090'
    volumes:
      - ./docker/prometheus/:/etc/prometheus/
      - prometheus-data:/prometheus
    command:
      - '--config.file=/etc/prometheus/config.yml'
      - '--storage.tsdb.path=/prometheus'
      - '--web.console.libraries=/usr/share/prometheus/console_libraries'
      - '--web.console.templates=/usr/share/prometheus/consoles'

volumes:
  postgres-data: {}
  rabbitmq-data: {}
  prometheus-data: {}
  grafana-data: {}
With your docker-compose.yml file in place, you will also need to add a config/config.exs file to allow your
application to communicate with your Postgres instance. In config/config.exs add the following:
use Mix.Config

config :elixir_popularity, ecto_repos: [ElixirPopularity.Repo]

config :elixir_popularity, ElixirPopularity.Repo,
  database: "elixir_popularity_repo",
  username: "postgres",
  password: "postgres",
  hostname: "localhost",
  log: false

config :logger, :console, format: "[$level] $message\n"
In order for this configuration to work, you’ll also need to create the ElixirPopularity.Repo module. Create
a file at lib/elixir_popularity/repo.ex with the following contents:
defmodule ElixirPopularity.Repo do
  use Ecto.Repo,
    otp_app: :elixir_popularity,
    adapter: Ecto.Adapters.Postgres
end
You’ll also want to start the ElixirPopularity.Repo under your application supervisor in lib/application.ex:
defmodule ElixirPopularity.Application do
  use Application

  def start(_type, _args) do
    children = [
      ElixirPopularity.Repo
    ]

    opts = [strategy: :one_for_one, name: ElixirPopularity.Supervisor]
    Supervisor.start_link(children, opts)
  end
end
The last thing that you will need to do is to fetch a copy of the docker directory from the GitHub repo associated
with this tutorial (https://github.com/akoutmos/elixir_popularity). I won’t deep dive into what exactly is in there, but
in short it is the Grafana+Prometheus+RabbitMQ configuration files needed for the tutorial.
Now that everything is up to date on the Elixir side and all the configuration files are in place, feel free to start the Docker Compose stack by running:
$ docker-compose up
Once Docker Compose is up and running, you should be able to run mix ecto.create && iex -S mix without any DB
connection errors.
Step 3: Add HackerNews API module and supporting struct - commit
In order to fetch data from the HackerNews API we’ll want to create a helper module to actually make the HTTP calls to
the API and a struct which will house all the relevant data that was fetched. Let’s start by creating our struct module.
Create a file lib/hackernews_item.ex with the following contents:
defmodule ElixirPopularity.HackernewsItem do
  alias __MODULE__

  defstruct text: nil, type: nil, title: nil, time: nil

  def create(text, type, title, unix_time) do
    %HackernewsItem{
      text: text,
      type: type,
      title: title,
      time: get_date_time(unix_time)
    }
  end

  defp get_date_time(nil), do: nil

  defp get_date_time(unix_time) do
    {:ok, date_time} = DateTime.from_unix(unix_time)

    DateTime.to_date(date_time)
  end
end
Once that is complete, we can create our HackerNews API module. Our module will reside in the file
lib/hackernews_api.ex. Before diving into how it works, here is the module in its entirety:
defmodule ElixirPopularity.HackernewsApi do
  @moduledoc """
  Fetches data from the Hackernews API, extracts the necessary fields,
  and massages some data
  """

  require Logger

  alias ElixirPopularity.HackernewsItem

  def get_hn_item(resource_id) do
    get_hn_item(resource_id, 4)
  end

  defp get_hn_item(resource_id, retry) do
    response =
      resource_id
      |> gen_api_url()
      |> HTTPoison.get([], hackney: [pool: :hn_id_pool])

    with {_, {:ok, body}} <- {"hn_api", handle_response(response)},
         {_, {:ok, decoded_payload}} <- {"payload_decode", Jason.decode(body)},
         {_, {:ok, data}} <- {"massage_data", massage_data(decoded_payload)} do
      data
    else
      {stage, error} ->
        Logger.warn(
          "Failed attempt #{5 - retry} at stage \"#{stage}\" with Hackernews ID of #{resource_id}. Error details: #{
            inspect(error)
          }"
        )

        if retry > 0 do
          get_hn_item(resource_id, retry - 1)
        else
          Logger.warn("Failed to retrieve Hackernews ID of #{resource_id}.")
          :error
        end
    end
  end

  defp handle_response({:ok, %HTTPoison.Response{status_code: 200, body: body}}) do
    {:ok, body}
  end

  defp handle_response({_, invalid_response}) do
    {:error, invalid_response}
  end

  defp gen_api_url(resource_id) do
    "https://hacker-news.firebaseio.com/v0/item/#{resource_id}.json"
  end

  defp massage_data(data) do
    {:ok,
     HackernewsItem.create(
       data["text"],
       data["type"],
       data["title"],
       data["time"]
     )}
  end
end
The entry point to this module is get_hn_item/1 which will then set a max retries limit and through the magic of tail
call recursion, attempt to retrieve the given HackerNews resource. If it is able to successfully fetch the HackerNews
resource, then it will decode the JSON payload and massage it into the HackernewsItem struct in the massage_data/1
function. Failures will be logged appropriately for ease of debugging and an :error atom will be returned if all retry
attempts are exhausted. You may have also noticed that our HTTPoison.get call is referencing a hackney pool. The
reason for that being that we will be making a large number of concurrent requests to HackerNews and for performance
reasons it would be best to have a pool of connections open to the same host. In order to create the pool, we’ll need to
add the following to our lib/application.ex file:
def start(_type, _args) do
  children = [
    :hackney_pool.child_spec(:hn_id_pool, timeout: 15000, max_connections: 100),
    ElixirPopularity.Repo
  ]

  opts = [strategy: :one_for_one]
  Supervisor.start_link(children, opts)
end
In order to test all of this out, run iex -S mix to open up an Elixir REPL and run
ElixirPopularity.HackernewsApi.get_hn_item(2306006). You should see the following output:
iex(1) ▶ ElixirPopularity.HackernewsApi.get_hn_item(2306006)
%ElixirPopularity.HackernewsItem{
  text: "",
  time: ~D[2011-03-09],
  title: "Elixir: Simple Object Orientation and charming syntax on top of Erlang",
  type: "story"
}
Things are coming together! We have our HackerNews API module in place and can now fetch data from HackerNews. Next we’ll be creating a module which will help up interface with RabbitMQ for use with Broadway.
Step 4: Create GenRMQ module to communicate with RabbitMQ - commit
For the last step in this two part tutorial, we’ll be creating a module which will be used to publish RabbitMQ. Since
we’ll be using Broadway to consume from RabbitMQ, we’ll need something to actually publish messages to the RabbitMQ. For
this purpose we’ll be using gen_rmq as it abstracts away all the boilerplate related to creating and managing a valid
open channel to RabbitMQ. If you recall, we added gen_rmq to our dependencies earlier on and already pulled it down.
So no changes needed to our mix.exs file. Create a file at lib/rmq_publisher.ex and add the following:
defmodule ElixirPopularity.RMQPublisher do
  @behaviour GenRMQ.Publisher

  @rmq_uri "amqp://rabbitmq:rabbitmq@localhost:5672"
  @hn_exchange "hn_analytics"
  @hn_item_ids_queue "item_ids"
  @hn_bulk_item_data_queue "bulk_item_data"
  @publish_options [persistent: false]

  def init do
    create_rmq_resources()

    [
      uri: @rmq_uri,
      exchange: @hn_exchange
    ]
  end

  def start_link do
    GenRMQ.Publisher.start_link(__MODULE__, name: __MODULE__)
  end

  def hn_id_queue_size do
    GenRMQ.Publisher.message_count(__MODULE__, @hn_item_ids_queue)
  end

  def publish_hn_id(hn_id) do
    GenRMQ.Publisher.publish(__MODULE__, hn_id, @hn_item_ids_queue, @publish_options)
  end

  def publish_hn_items(items) do
    GenRMQ.Publisher.publish(__MODULE__, items, @hn_bulk_item_data_queue, @publish_options)
  end

  def item_id_queue_name, do: @hn_item_ids_queue

  def bulk_item_data_queue_name, do: @hn_bulk_item_data_queue

  defp create_rmq_resources do
    # Setup RabbitMQ connection
    {:ok, connection} = AMQP.Connection.open(@rmq_uri)
    {:ok, channel} = AMQP.Channel.open(connection)

    # Create exchange
    AMQP.Exchange.declare(channel, @hn_exchange, :topic, durable: true)

    # Create queues
    AMQP.Queue.declare(channel, @hn_item_ids_queue, durable: true)
    AMQP.Queue.declare(channel, @hn_bulk_item_data_queue, durable: true)

    # Bind queues to exchange
    AMQP.Queue.bind(channel, @hn_item_ids_queue, @hn_exchange, routing_key: @hn_item_ids_queue)
    AMQP.Queue.bind(channel, @hn_bulk_item_data_queue, @hn_exchange, routing_key: @hn_bulk_item_data_queue)

    # Close the channel as it is no longer needed
    # GenRMQ will manage its own channel
    AMQP.Channel.close(channel)
  end
end
It may seem like there is quite a bit going on here, so let’s dive in and break it down. We are going to be
implementing the GenRMQ.Publisher behaviour which requires us to have a init/0 function which returns some options
for gen_rmq to create the open channel to RabbitMQ. Specifically, those options are the exchange on which gen_rmq
will operate and the URI of the RabbitMQ server. Before returning those options though, we make a private call to
create_rmq_resource/0 which leverages the AMQP library (gen_rmq is built on top of the AMQP library) to create some
queues and bind them to our desired exchange. The remainder of the functions in the module can now be leveraged to
perform various actions against RabbitMQ such as publishing messages and queue sizes.
In order to have our gen_rmq module start within a process, we’ll need to add it as a child in our application module
lib/application.ex:
def start(_type, _args) do
  children = [
    :hackney_pool.child_spec(:hn_id_pool, timeout: 15000, max_connections: 100),
    ElixirPopularity.Repo,
    %{
      id: ElixirPopularity.RMQPublisher,
      start: {ElixirPopularity.RMQPublisher, :start_link, []}
    }
  ]

  opts = [strategy: :one_for_one]
  Supervisor.start_link(children, opts)
end
With all this in place, we can run a quick sanity check (to ensure that everything is working) by opening up our Elixir REPL and running a few commands:
iex(1) ▶ ElixirPopularity.RMQPublisher.hn_id_queue_size()
0
iex(2) ▶ Enum.each(1..15, &ElixirPopularity.RMQPublisher.publish_hn_id("#{&1}"))
:ok
iex(3) ▶ ElixirPopularity.RMQPublisher.hn_id_queue_size()
15
As an added bonus, when setting up our Docker Compose stack, we enabled the RabbitMQ administrator dashboard! To
see some statistics on RabbitMQ, open up http://localhost:15672 in your browser, and enter the super secret
credentials of Username: rabbitmq | Password: rabbitmq to enter the dashboard. Once there you can explore at your
leisure or navigate to http://localhost:15672/#/queues/%2F/item_ids to see the status of the queue after we published
those 15 messages:
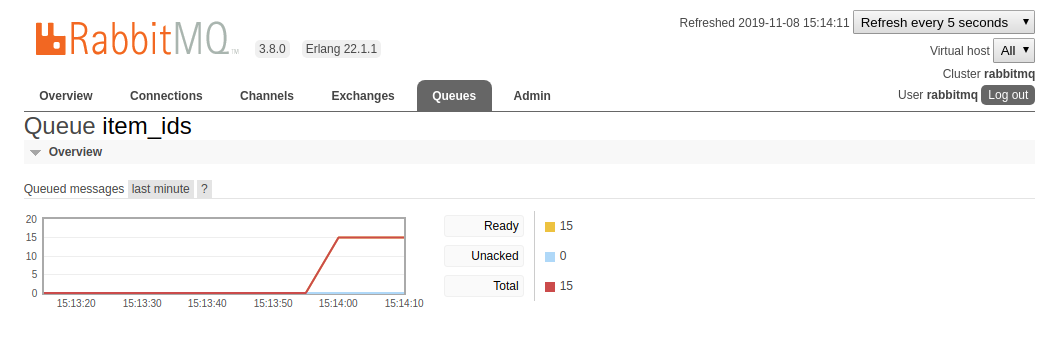
You can also purge the queue of all messages since we have no consumers at the moment for our queue. There is a button
at the bottom of the Queue item_ids page called Purge Messages. Clicking that will empty the queue of all messages.
Closing thoughts
Well done and thanks for sticking with me to the end! We covered quite a lot of ground and hopefully you picked up a couple of cool tips and tricks along the way. To recap, in Part 1 of our RabbitMQ+Broadway series we examined the tradeoffs that need to be weighed when deciding whether a message queue is the right tool for the job. We also talked about what exactly Broadway is and how it leverages RabbitMQ to provide a powerful data processing pipeline. Finally, we laid down the foundation for our HackerNews data mining tool. In Part 2 we’ll finish off the implementation of our HackerNews data miner by implementing the necessary Broadway modules and writing our results to Postgres.
Feel free to leave comments or feedback or even what you would like to see in the next tutorial. Till next time!
Additional Resources
Below are some additional resources if you would like to deep dive into any of the topics covered in the post.
- https://github.com/plataformatec/broadway
- https://github.com/plataformatec/broadway_rabbitmq
- https://www.rabbitmq.com/tutorials/tutorial-one-elixir.html
- https://www.rabbitmq.com/prometheus.html
- https://hexdocs.pm/gen_rmq/2.3.0/readme.html
- https://www.cloudamqp.com/blog/2014-12-03-what-is-message-queuing.html
comments powered by Disqus