Contents
Intro
First of all, my apologies for not having written a blog post since July of last year! Between maintaining all my open source libraries, publishing Build a Weather Station with Elixir and Nerves, starting Elixir Patterns with Hugo Barauna, running my consulting business and being a host on the BEAM Radio podcast…something had to give and unfortunately it was my Elixir blog 😔. But alas, I have promised myself that I can (and will) write a new blog post every quarter as opposed to every month like I used to. All this to say: don’t worry, the blog is not dead and new content is coming!
With that aside, let’s dive into today’s article! In this blog post, we’ll be talking about something really awesome
that was introduced in Elixir 1.12.0, but that perhaps goes underutilized. Specifically, I am talking about
Mix.install and how it can be used to write useful shell scripts. While this won’t replace all of your existing Bash
and Python CLI tools, this can be an easy way for you to write your own utilities in your favorite programming language
😉. Without further ado, let’s dive right into things!
Writing a basic Elixir shell script
While Elixir 1.12.0 didn’t necessarily unlock the ability to write shell scripts using Elixir, it definitely made writing shell scripts easier when you have external dependencies. But before we get into that, let’s see what a very basic shell script looks like using Elixir.
Start off by creating a file anywhere on your filesystem. For example, I created the file hello_world with the
following contents:
#! /usr/bin/env elixir

IO.puts("Hello world!")
The first line in this file tells your shell to use the elixir executable that first appears in your $PATH
environment variable. You can also hard-code a path like #! /bin/elixir, but this has the ability to fail since that
path may not exist on an other user’s machine. In addition, if you use something like ASDF to
manage your runtime versions, you may not be invoking the version you think you are. The last line is a simple Elixir
print statement so you can make sure that our script runs as expected.
After creating that file, make sure that you run chmod a+x ./hello_world so that your file has execution privileges.
With all that in place, all you need to do is run the script:
$ ./hello_world
Hello world!
And with that, you have a shell script that you can run from your command line! Let’s turn it up a notch and create a simple HTTP stress tester using the same approach and more of the Elixir standard library.
Writing an HTTP stress test script
For this next shell script, you’ll start off in much the same way as before. Create a new file using your favorite
editor. In my case I called my file http_stress (make sure you give the file execution permissions via chmod). This
script will be a bit more complicated than the previous script as we need to accept user CLI input, parse it, start
networking Erlang applications and run the actual load test. Let’s start by parsing the user’s CLI arguments:
#! /usr/bin/env elixir

cli_args = System.argv()
supported_cli_args = [url: :string, total_requests: :integer, concurrency: :integer]

%{url: url, total_requests: total_requests, concurrency: concurrency} =
  cli_args
  |> OptionParser.parse(strict: supported_cli_args)
  |> case do
    {parsed_cli_args, [], []} when length(parsed_cli_args) == 3 ->
      Map.new(parsed_cli_args)

    _ ->
      raise "Invalid arguments were provided"
  end
In this code snippet, we fetch the command line arguments provided to the script via System.argv(), and then pass
those arguments along with a definition of all the supported arguments for the script (the supported_cli_args keyword
list) to the OptionParser.parse/2 function. This function parses the CLI arguments and returns a three element
tuple where the first element contains a keyword list of all the valid arguments, the second arguments contains the
arguments that were not specified in the supported arguments list, and the last argument contains any invalid arguments.
In the above snippet, I use a guard clause to ensure that the length of the valid arguments list provided by
OptionParser.parse/2 is three, else raise an error. You can get a little fancier here and check which arguments are
missing and provide a more specific error message 😊.
With our input fully parsed we are ready to start stress testing! Add the following to your shell script and let’s then review how it all works:
#! /usr/bin/env elixir

...

:inets.start()
:ssl.start()

case :httpc.request(:get, {String.to_charlist(url), []}, [ssl: [verify: :verify_none]], []) do
  {:error, _} ->
    raise "Failed to connect to the provided URL"

  _ ->
    :ok
end

test_start_time = System.monotonic_time()

results =
  1..total_requests
  |> Task.async_stream(
    fn _ ->
      start_time = System.monotonic_time()
      :httpc.request(:get, {String.to_charlist(url), []}, [ssl: [verify: :verify_none]], [])
      System.monotonic_time() - start_time
    end,
    max_concurrency: concurrency
  )
  |> Enum.map(fn
    {:ok, req_time} -> System.convert_time_unit(req_time, :native, :millisecond)
    _ -> []
  end)
  |> List.flatten()

total_test_time = System.convert_time_unit(System.monotonic_time() - test_start_time, :native, :millisecond)

IO.puts("Total test time: #{total_test_time}ms")
IO.puts("Average response time to GET #{url}: #{Enum.sum(results) / length(results)}ms")
IO.puts("Min response time: #{Enum.min(results)}ms")
IO.puts("Max response time: #{Enum.max(results)}ms")
We being this portion of the code by starting the :inets and :ssl Erlang applications as we need those to make
HTTP requests. After those two applications are started, we make a single request to the provided URL to ensure that it
is a valid URL. If that succeeds, we capture the system monotonic time to know when the test started and we then use
Task.async_stream/3 to run all of the stress tests with the desired level of concurrency, capturing the duration
for each request that is made. After all the tests complete, some basic statistics are generated and then presented to
the user.
With the HTTP stress test script all put together, it is time to take it for a test drive. Take a look at some of the following examples to see how the script behaves when valid arguments are provided and when invalid arguments are provided.
$ ./http_stress --url https://akoutmosssssssssss.com --total-requests 500 --concurrency 100
** (RuntimeError) Failed to connect to the provided URL
    http_stress:22: (file)
    (elixir 1.13.3) lib/code.ex:1183: Code.require_file/2

$ ./http_stress
** (RuntimeError) Invalid arguments were provided
    http_stress:14: (file)
    (elixir 1.13.3) lib/code.ex:1183: Code.require_file/2

$ ./http_stress --url https://akoutmos.com --total-requests 500 --concurrency 50
Total test time: 2201ms
Average response time to GET https://akoutmos.com: 104.462ms
Min response time: 31ms
Max response time: 2192ms

$ ./http_stress --url https://akoutmos.com --total-requests 500 --concurrency 100
Total test time: 1526ms
Average response time to GET https://akoutmos.com: 263.004ms
Min response time: 38ms
Max response time: 1372ms
While this simple stress test script may not compare with something like ApacheBench, k6, or wrk in terms of features, it is pretty cool what can be done in about 50 lines of Elixir code.
Now that you have a good handle on how to write shell scripts using Elixir, it’s time to get to the meat of this article and learn how to leverage external dependencies in your script!
Using External Dependencies
In order to really flex our Elixir CLI muscles, in this section, we’ll be writing an Elixir JSON pretty printer, that takes its input from STDIN, and uses the Jason library to parse the provided JSON payload. After the JSON payload is parsed, we’ll recursively traverse the data structure, and properly tab and print the contents of the JSON payload with colors for each of the data types. With a plan in place, let’s get started and see how this works.
Let’s create a new file called json in the current directory and give it execute permissions. With that done, open up
json with your editor and add the following to get started:
#! /usr/bin/env elixir

Mix.install([:jason])

defmodule JsonPrettyPrinter do
  def get_stdin_data do
    :stdio
    |> IO.read(:all)
    |> Jason.decode()
    |> case do
      {:ok, json_data} -> json_data
      _ -> raise "Invalid JSON payload was provided"
    end
  end
end

JsonPrettyPrinter.get_stdin_data()
|> JsonPrettyPrinter.pretty_print_json()
|> IO.puts()
As you can see, we start the script in exactly the same way as we did the other examples with #! /usr/bin/env elixir.
After that, we call Mix.install([:jason]) which tells Mix to install the Jason dependency and store it in either the
path provided in the MIX_INSTALL_DIR variable or by default your operating system’s cache directory. To see where this
cache directory is, you can run Path.join(Mix.Utils.mix_cache(), "installs") in an IEx session. Mix.Utils is an
undocumented Elixir module, so that may or may not exist in the future. On my Macbook for example, the Mix cache
directory is /Users/HOME/Library/Caches/mix. You can also specify a version for your dependencies by providing a tuple
exactly like you would in your mix.exs file for a project: Mix.install([{:jason, "~> 1.3.0"}].
Next, we define a module called JsonPrettyPrinter which we’ll use to house all of the pretty printing utility
functions. The first function that we’ll create is the one that will read from STDIN. Using IO.read/2 and
Jason.decode/1 we are able to read all of the data from STDIN and parse the data using Jason. If the data is not valid
JSON, we raise and exit the script. After the module declaration, we have a very simple pipe chain that calls the
JsonPrettyPrinter.get_stdin_data/0 function and then passes it to JsonPrettyPrinter.pretty_print_json and prints the
result. Let’s fill out the rest of the JsonPrettyPrinter module to wrap up this implementation:
defmodule JsonPrettyPrinter do
  ...

  def pretty_print_json(data) do
    body =
      data
      |> Enum.to_list()
      |> Enum.sort()
      |> Enum.map(fn {key, value} ->
        ~s/  #{color_data(:green, key)}#{color_data(:yellow, ":")} #{pretty_print(value, 1)}/
      end)
      |> Enum.join(",\n")

    """
    #{color_data(:yellow, "{")}
    #{body}
    #{color_data(:yellow, "}")}
    """
  end

  defp pretty_print(current_data, _indent_level) when is_number(current_data),
    do: color_data(:blue, current_data)

  defp pretty_print(current_data, _indent_level) when is_boolean(current_data),
    do: color_data(:magenta, current_data)

  defp pretty_print(current_data, _indent_level) when is_binary(current_data),
    do: color_data(:cyan, ~s/"#{current_data}"/)

  defp pretty_print(current_data, _indent_level) when is_nil(current_data),
    do: color_data(:red, "null")

  defp pretty_print(current_data, _indent_level) when current_data == %{},
    do: color_data(:yellow, "{}")

  defp pretty_print(current_data, _indent_level) when current_data == [],
    do: color_data(:yellow, "[]")

  defp pretty_print(current_data, indent_level) when is_list(current_data) do
    indent_padding = String.duplicate(" ", indent_level * 2)
    next_indent_padding = String.duplicate(" ", (indent_level + 1) * 2)

    body =
      current_data
      |> Enum.sort()
      |> Enum.map(fn element ->
        ~s/#{next_indent_padding}#{pretty_print(element, indent_level + 1)}/
      end)
      |> Enum.join(",\n")

    Enum.join(
      [
        color_data(:yellow, "["),
        body,
        "#{indent_padding}#{color_data(:yellow, "]")}"
      ],
      "\n"
    )
  end

  defp pretty_print(current_data, indent_level) when is_map(current_data) do
    indent_padding = String.duplicate(" ", indent_level * 2)
    next_indent_padding = String.duplicate(" ", (indent_level + 1) * 2)

    body =
      current_data
      |> Enum.to_list()
      |> Enum.sort()
      |> Enum.map(fn {key, value} ->
        ~s/#{next_indent_padding}#{color_data(:green, key)}#{color_data(:yellow, ":")} #{pretty_print(value, indent_level + 1)}/
      end)
      |> Enum.join(",\n")

    Enum.join(
      [
        color_data(:yellow, "{"),
        body,
        "#{indent_padding}#{color_data(:yellow, "}")}"
      ],
      "\n"
    )
  end

  defp color_data(color, data), do: apply(IO.ANSI, color, []) <> "#{data}" <> IO.ANSI.reset()
end
I won’t dive too deep into the previous code as it is mostly some recursion, pattern matching and guard clauses to
properly color and format the data. One function that I will touch on though is the color_data/2 function as that is
useful for CLI tools. By using the IO.ANSI module, you can colorize your terminal output. Be sure to check out the
documentation to see all the options available to you!
With that done, the JSON pretty printer is complete! Let’s throw some data at it and see how it responds (the dummy test file was taken from https://json.org/example.html):
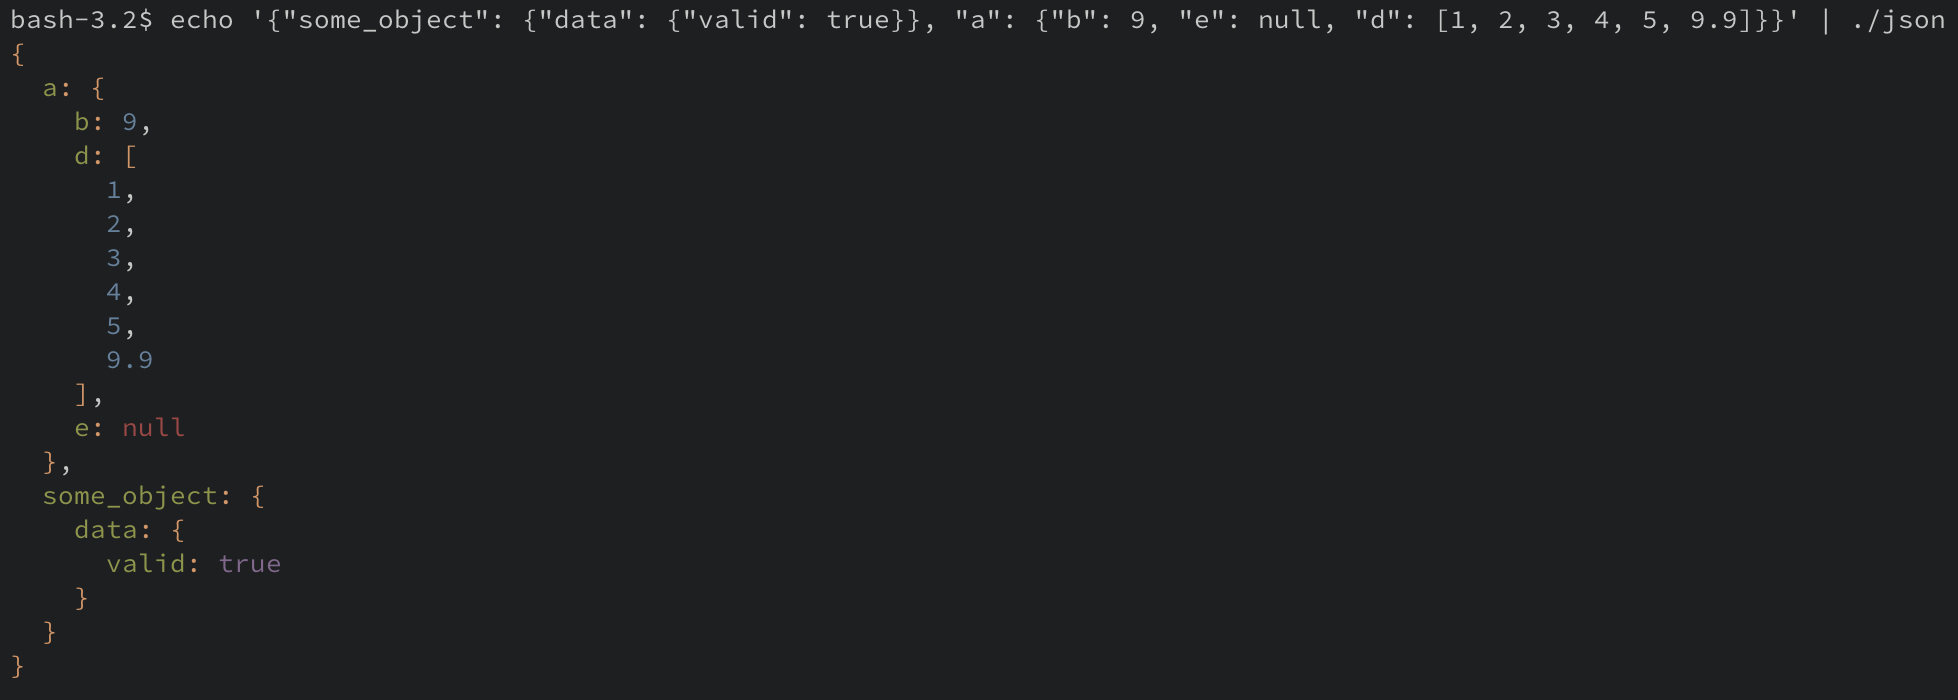

And with that, our very basic JSON pretty printer is complete! As you can see, you can pipe any data you like to the scripts STDIN, and the Elixir script will handle it just the same.
Closing thoughts
Thanks for stick with me till the end and hopefully you enjoyed it! I hope you picked up a couple of cool tips and tricks along the way 😊. As you saw from the post, Elixir along with its standard library and Hex ecosystem makes for a great scripting language environment. For every day CLI scripts and tools that live along side your project repos, this is a viable path and it makes it easier for developers to stay within a single language. Feel free to leave comments or feedback or even what you would like to see in the next blog post. Till next time!
comments powered by Disqus