Contents
Intro
In this post we’ll talk about what a release is in the context of Elixir and why/when you should use it. We’ll also cover how this was performed historically and how this changes in Elixir 1.9. Finally we’ll go through creating an Elixir release inside of a Docker container using multi-stage builds. Without further ado, let’s dive right into things!
What is a release?
An Elixir release (and Erlang of course) is the process of taking your application and bundling it so that it is ready for distribution (generally called an OTP release). Part of the bundling process can also include packaging ERTS (Erlang Runtime System) so that you have a completely standalone build artifact that can be executed on a target machine regardless of whether Erlang/Elixir is installed. It is important to note that where you build a release should match the end target machine. In other words, I cannot build a release on a Linux machine and then run the release on a Windows machine. In order for an OTP release to be compatible between build and target machine, three things need to be consistent: architecture, OS, and application binary interface. It is also important to note that Elixir 1.9 brings the release creation process directly into Elixir core where as before you had to rely on tools like Distillery to generate releases. Tools like Distillery still serve a purpose (like streamlining hot code upgrades), but having this functionality in Elixir core makes it easier to get started and takes care of most deployment use cases. A huge thanks to Paul Schoenfelder (https://github.com/bitwalker) by the way for all his work on Distillery (and the many other libs he maintains)! I am a happy user of many of Paul’s tools and I am grateful for his contribution to the Elixir community.
Why use releases?
There are several benefits to producing an OTP release over copying you code over to the target machine and then running it directly there. Some of these benefits include:
- Your application is self contained and makes distribution a lot simpler. You no longer need to provision a machine with a runtime installed.
- Can have multiple applications deployed to a single machine with different runtime versions.
- Makes it easy to connect a remote shell to a running release for introspection.
- Your application starts faster given that all application modules are preloaded vs lazy loaded.
- Makes it explicit what are run-time vs build-time application configurations.
- Easy control over BEAM VM flags (http://erlang.org/doc/man/erl.html#emu_flags).
Show me the code!
In order to showcase the process and capabilities of an OTP release, we’ll put together an OTP release for a Phoenix
app. Our release will make use of run-time configuration to demonstrate how your app can be configured via
environment variables. We’ll be doing all of this via Docker and will make use of multi-stage builds in order to keep
our image size slim. As a cherry on top, we’ll attach an IEx session to our running app so that we can introspect it. The
full code can be found at https://github.com/akoutmos/docker_elixir_19_release where each commit lines up with the
below steps. This tutorial assumes you have Elixir 1.9 running on your machine (if you need help getting to that stage
I recommend following this tutorial https://elixircasts.io/installing-elixir-with-asdf). For this exercise I am currently
running Elixir -> 1.9.0-rc.0 and Phoenix -> 1.4.8.
Step 1: Create a new Phoenix project - commit
Install the Phoenix project generator.
$ mix archive.install hex phx_new 1.4.8
Generate a new project. You can replace docker_elixir_19_release with what ever your project is called and can also re-enable ecto and webpack if your app requires it.
$ mix phx.new docker_elixir_19_release --no-ecto --no-webpack
In order to ensure that everything works, switch into the project directory and start the server.
$ cd docker_elixir_19_release
$ mix phx.server
If all goes well you should see the default Phoenix homepage when you navigate to http://localhost:4000
Step 2: Initialize Elixir 1.9 release files and create a release - commit
In order to create an OTP release, there need to be certain configuration files in place. To generate these config files run the following.
$ mix release.init
$ touch config/releases.exs
Inside of config/releases.exs add the following (replacing :docker_elixir_19_release with whatever the name of your project is). The configurations that you specify here will need to be provided at run-time. As you can see, System.fetch_env!/1 ends in an exclamation point and thus will raise an error if the environment variable is not available. This is useful because it will immediately be apparent in your logs why your application failed to start (we will try this later on).
import Config

config :docker_elixir_19_release,
  cool_text: System.fetch_env!("COOL_TEXT")
You can go ahead and delete config/prod.secret.exs as we’ll perform those configuration steps within config/releases.exs instead. This will allow us to configure the port and secret key base for our Phoenix app at run time vs build time. Your config/releases.exs should like like this after this step.
import Config

secret_key_base = System.fetch_env!("SECRET_KEY_BASE")
cool_text = System.fetch_env!("COOL_TEXT")
application_port = System.fetch_env!("APP_PORT")

config :docker_elixir_19_release, DockerElixir19ReleaseWeb.Endpoint,
  http: [:inet6, port: String.to_integer(application_port)],
  secret_key_base: secret_key_base

config :docker_elixir_19_release,
  cool_text: cool_text
Inside of config/prod.exs remove the following as we are no longer importing secrets for production use.
import_config "prod.secret.exs"
While you are in config/prod.exs uncomment the following line.
config :docker_elixir_19_release, DockerElixir19ReleaseWeb.Endpoint, server: true
In order to show that our app now has run time configuration, inside of templates/page/index.html.eex, add the following somewhere in the template.
<p><%= Application.get_env(:docker_elixir_19_release, :cool_text) %></p>
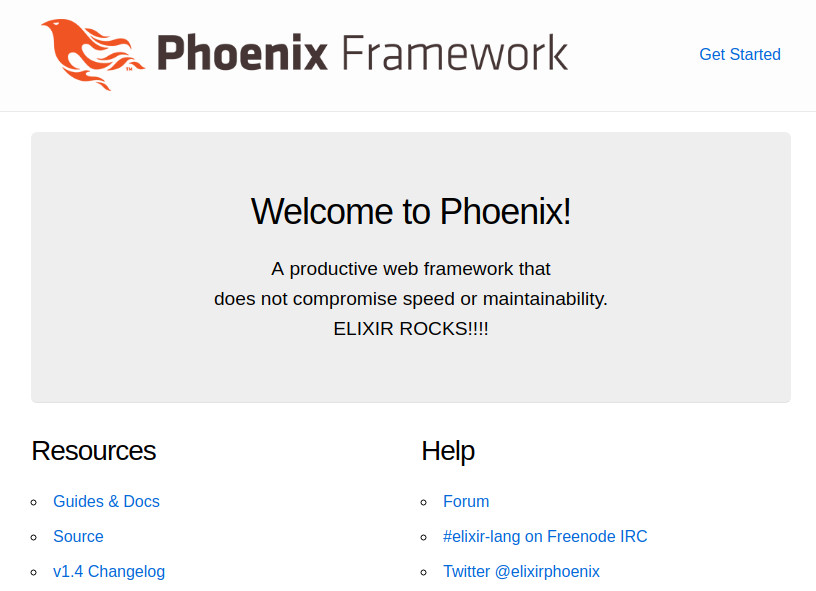
To generate our first release and serve it, run the following. If you go to localhost:4000 you should see the below image with your run time configured COOL_TEXT.
$ mix phx.digest
$ MIX_ENV=prod mix release
$ APP_PORT=4000 COOL_TEXT="Elixir Rocks" SECRET_KEY_BASE=$(mix phx.gen.secret) _build/prod/rel/docker_elixir_19_release/bin/docker_elixir_19_release start
Step 3: Create a multi-stage Dockerfile - commit
To begin, we need to create the first stage of the multi-part Dockerfile, the builder stage. The comments in the Dockerfile below should explain the various sections, but at a high level we are installing Elixir 1.9 release candidate 0 since it is not available on dockerhub yet, and then installing rebar and hex. From there we copy over the necessary project files from the host to build the application, and generate a release. Below are the contents of the Dockerfile that you should have at the root of the project. We’ll append to it in the next section.
# ---- Build Stage ----
FROM erlang:21 AS app_builder

# Set environment variables for building the application
ENV MIX_ENV=prod \
    TEST=1 \
    LANG=C.UTF-8

# Fetch the latest version of Elixir (once the 1.9 docker image is available you won't have to do this)
RUN set -xe \
  && ELIXIR_DOWNLOAD_URL="https://github.com/elixir-lang/elixir/archive/v1.9.0-rc.0.tar.gz" \
  && ELIXIR_DOWNLOAD_SHA256="fa019ba18556f53bfb77840b0970afd116517764251704b55e419becb0b384cf" \
  && curl -fSL -o elixir-src.tar.gz $ELIXIR_DOWNLOAD_URL \
  && echo "$ELIXIR_DOWNLOAD_SHA256  elixir-src.tar.gz" | sha256sum -c - \
  && mkdir -p /usr/local/src/elixir \
  && tar -xzC /usr/local/src/elixir --strip-components=1 -f elixir-src.tar.gz \
  && rm elixir-src.tar.gz \
  && cd /usr/local/src/elixir \
  && make install clean

# Install hex and rebar
RUN mix local.hex --force && \
    mix local.rebar --force

# Create the application build directory
RUN mkdir /app
WORKDIR /app

# Copy over all the necessary application files and directories
COPY config ./config
COPY lib ./lib
COPY priv ./priv
COPY mix.exs .
COPY mix.lock .

# Fetch the application dependencies and build the application
RUN mix deps.get
RUN mix deps.compile
RUN mix phx.digest
RUN mix release
Now that the build stage is complete, we need to have put together the actual application container. Add the following to the Dockerfile you created in the previous step (once again comments in the file should explain the various parts of the Dockerfile). One important thing to notice is that our final application image is based on debian and not Erlang or Elixir. Given that the ERTS is bundled within the release, we can run a plain debian base image and produce a smaller image (you can also use alpine if you prefer but the build step will also require some changes if you chose to go that route).
# ---- Application Stage ----
FROM debian:stretch AS app

ENV LANG=C.UTF-8

# Install openssl
RUN apt-get update && apt-get install -y openssl

# Copy over the build artifact from the previous step and create a non root user
RUN useradd --create-home app
WORKDIR /home/app
COPY --from=app_builder /app/_build .
RUN chown -R app: ./prod
USER app

# Run the Phoenix app
CMD ["./prod/rel/docker_elixir_19_release/bin/docker_elixir_19_release", "start"]
Now that the Dockerfile is complete, go ahead and build the application image. Replace my-app with whatever you want to tag your application. You can also see the size different in the containers!
$ docker build -t my-app .
$ docker images
REPOSITORY                                                     TAG                 IMAGE ID            CREATED             SIZE
my-app                                                         latest              4d2adfff908e        33 minutes ago      187MB
elixir                                                         latest              5d7ef0eb3b2f        5 days ago          1.08GB
erlang                                                         21                  b8eb89e9bff3        11 days ago         1.07GB
Now that our application has been built and bundled into a container, you can run the app and provide it the necessary environment variables by doing the following (if you changed the tag of the image make sure you update it below). You should see the Phoenix homepage now with your environment configurable text.
$ docker run --publish 4000:4000 --env COOL_TEXT='ELIXIR ROCKS!!!!' --env SECRET_KEY_BASE=$(mix phx.gen.secret) --env APP_PORT=4000 my-app:latest
20:53:09.311 [info] Running DockerElixir19ReleaseWeb.Endpoint with cowboy 2.6.3 at :::4000 (http)
20:53:09.311 [info] Access DockerElixir19ReleaseWeb.Endpoint at http://example.com
Step 4: Introspect a running application - commit
For this step, we are going to add an additional dependency to our project and rebuild the docker image. After that we will run the container and attach to the running Phoenix app and introspect it with observer_cli. To begin, add {:observer_cli, "~> 1.5"} to your dependency list in mix.exs and rebuild the docker image.
$ docker build -t my-app .
This time when we run the image we’ll pass in the additional --name flag to make it easy to access the running image
$ docker run --name my_app --publish 4000:4000 --env COOL_TEXT='ELIXIR ROCKS!!!!' --env SECRET_KEY_BASE=$(mix phx.gen.secret) --env APP_PORT=4000 my-app:latest
23:59:56.027 [info] Running DockerElixir19ReleaseWeb.Endpoint with cowboy 2.6.3 at :::4000 (http)
23:59:56.027 [info] Access DockerElixir19ReleaseWeb.Endpoint at http://example.com
In a separate terminal run the following in order to get a shell into the running container and attach an IEx shell to the running application
$ docker exec -it my_app bash
$ ./prod/rel/docker_elixir_19_release/bin/docker_elixir_19_release remote
Now that we have a remote IEx shell attached to our running application, you can start up the CLI observer by running the following.
> :observer_cli.start()
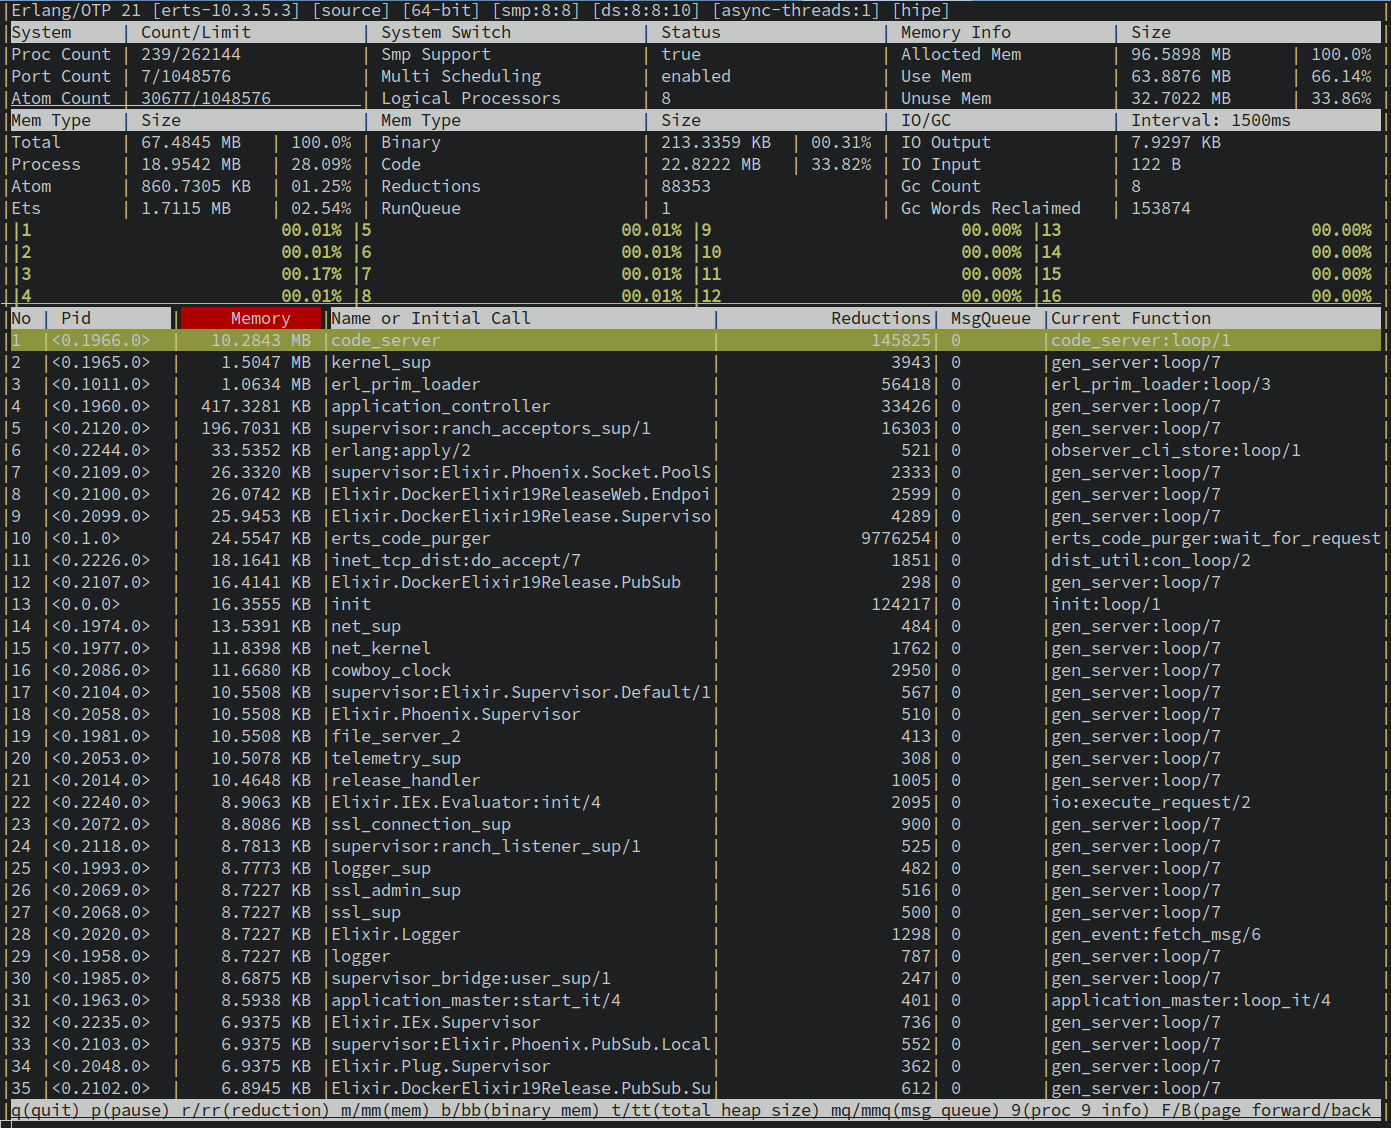
To show that this is indeed the same container that we spun up earlier, with the CLI observer running, we’ll simulate some load on our server and see that the CLI observer reacts appropriately. Go to the Network tab in observer CLI by entering capital N and enter. As you can see in the image below there is not a lot going on given that nothing is interacting with our application.

In another terminal (with the observer still running), run the following (you may need to install wrk2 on your system if you don’t have it already installed https://github.com/giltene/wrk2). With a good amount of load hitting your system now, you should see something like the following in your Network tab in observer CLI.
$ wrk2 -c 100 -d 10s -R 10 http://localhost:4000/

Closing thoughts
Well done and thanks for sticking with me to the end! We covered quite a lot of ground and hopefully you picked up a couple of cool tips and tricks along the way. In this tutorial we covered how to leverage Elixir 1.9 releases and Docker multi-stage builds in order to create lightweight docker images where our application and the ERTS are all neatly bundled. We also learned how to go about configuring our application at run-time. In addition, we also learned how to attach an IEx session to a running instance of our application, and how we can introspect that application. All in all the Elixir 1.9 release has made deploying Elixir applications far easier and way more streamlined. A huge thanks to all the people who put their time and effort into such an awesome release :).
Feel free to leave comments or feedback or even what you would like to see in the next tutorial. Till next time!
Additional Resources
Below are some additional resources if you would like to deep dive into any of the topics covered in the post.
- https://hexdocs.pm/mix/master/Mix.Tasks.Release.html
- http://erlang.org/doc/design_principles/release_structure.html
- https://hexdocs.pm/distillery/home.html
- http://blog.plataformatec.com.br/2019/05/updating-hex-pm-to-use-elixir-releases/
- https://docs.docker.com/develop/develop-images/multistage-build/
comments powered by Disqus